
Cleaning an air purifier placed in a garage is essential for its efficiency. Dust, dirt, and debris can quickly accumulate.
This can reduce the air purifier’s performance and lifespan. Garages are prone to collecting dust, car fumes, and other pollutants. These contaminants can clog your air purifier and make it work harder. Regular cleaning ensures it continues to provide clean air.
It also prevents any buildup that might damage the unit. Whether you’re new to air purifiers or have used them for years, knowing how to clean one in a garage is vital. This guide will walk you through the steps to keep your air purifier in top shape. Let’s dive in and ensure your air stays fresh and clean.
Preparation Steps
Cleaning an air purifier in your garage may seem daunting. But with the right preparation, the task becomes simple and efficient. Follow these preparation steps to ensure a thorough cleaning process.
Gathering Supplies
First, gather all the necessary supplies to clean your air purifier effectively. Here is a list of items you will need:
- Soft cloths or microfiber towels
- Vacuum cleaner with brush attachment
- Warm water and mild detergent
- Replacement filters (if needed)
- Compressed air (optional)
Having everything ready will help you complete the task without interruptions. Make sure your supplies are within reach.
Ensuring Safety
Safety should be your top priority while cleaning. Follow these steps to ensure a safe environment:
- Unplug the air purifier before starting. This prevents electric shocks.
- Wear gloves to protect your hands from dust and cleaning agents.
- Ensure the garage is well-ventilated. Open windows or doors if possible.
- Keep a safe distance from any chemicals or sharp objects stored in the garage.
Taking these precautions will ensure your safety and make the cleaning process smoother.
Once you have gathered your supplies and ensured safety, you are ready to start cleaning your air purifier. Proper preparation sets the stage for a successful cleaning task.
Disassembling The Air Purifier
Cleaning your air purifier is essential to maintain its performance. Disassembling the air purifier correctly ensures that you can clean each part effectively. Let’s dive into the steps required for proper disassembly.
Removing The Filter
The filter is the most crucial part of your air purifier. First, turn off and unplug the device to ensure safety. Locate the filter compartment, usually at the back or bottom of the unit. Open the compartment cover by pressing the release tabs or unscrewing it. Carefully pull out the filter to avoid damaging it. Check the filter type; some can be washed, while others need replacement.
Detaching Other Components
Next, focus on other removable parts of the air purifier. These may include the pre-filter, UV-C light bulb, and ionizer. Consult the user manual to identify these components. Gently detach each part by following the manufacturer’s instructions. Take note of how each piece fits together for easy reassembly. Clean these components according to the guidelines provided in the manual. Proper cleaning will ensure your air purifier runs efficiently.
Cleaning The Filter
Cleaning the filter of your air purifier is essential. It ensures the unit works efficiently, especially in a dusty garage. Regular cleaning keeps the air fresh and extends the purifier’s life. This guide will cover simple steps to clean the filter effectively.
Washing Methods
First, remove the filter from the air purifier. Check the manual for specific instructions. Use a soft brush to remove loose dust. For a deeper clean, rinse the filter with lukewarm water. Avoid using soap or harsh chemicals. Gently scrub any stubborn dirt with a soft brush. Rinse thoroughly to remove all debris.
Drying Techniques
After washing, it’s important to dry the filter completely. Shake off excess water. Let the filter air dry in a well-ventilated area. Avoid direct sunlight as it can damage the filter. Ensure the filter is completely dry before placing it back in the purifier. Moisture can lead to mold growth, reducing air quality.
Cleaning The Exterior
Maintaining the exterior of your air purifier in the garage is essential. It helps ensure the device operates efficiently. Dust and grime can accumulate on the surface over time. Regular cleaning keeps it looking good and functioning well.
Wiping Down Surfaces
Start by unplugging the air purifier. Use a soft, damp cloth to wipe down the exterior. Avoid harsh chemicals as they can damage the surface. A mixture of mild soap and water works well. Gently clean all visible areas. Pay special attention to the air intake and exhaust vents. These areas can gather the most dust.
Cleaning Hard-to-reach Areas
Some parts of the air purifier can be tricky to clean. For these, use a soft brush or a vacuum with a brush attachment. Carefully brush or vacuum between the vents and crevices. This helps remove dust and debris that a cloth cannot reach. Be gentle to avoid damaging the device. Regular cleaning of these areas ensures optimal airflow and performance.
Cleaning The Interior
Cleaning the interior of an air purifier placed in a garage is essential. Dust and debris can accumulate inside, affecting its performance. This section covers the steps to clean the interior, ensuring your air purifier works efficiently.
Vacuuming Dust
Start by unplugging the air purifier. Open the unit as per the manufacturer’s instructions. Use a vacuum cleaner with a brush attachment. Carefully vacuum the interior to remove dust and debris. Focus on the fan blades and motor areas. Ensure all dust is removed to maintain efficiency.
Using Compressed Air
Compressed air can reach areas a vacuum can’t. Use a can of compressed air to blow out any remaining dust. Hold the can upright and keep it a few inches away from components. Spray short bursts to avoid moisture buildup. Pay special attention to corners and crevices where dust hides.

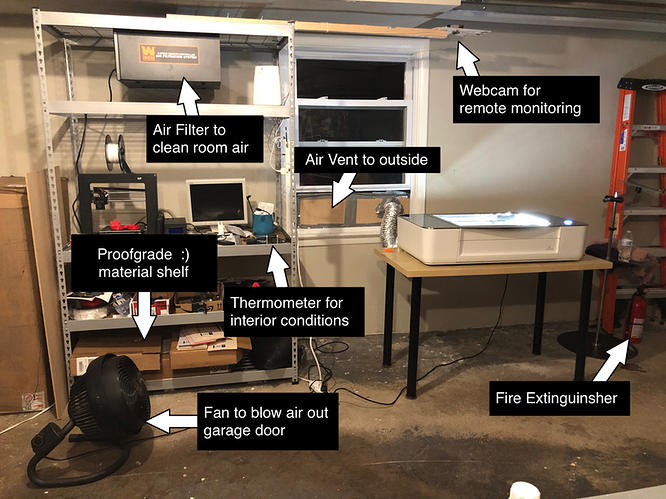
Credit: www.amazon.com
Reassembling The Air Purifier
Reassembling an air purifier can seem challenging. But, with the right steps, it becomes straightforward. Once you have cleaned all the parts, it’s time to put them back together. This part is crucial for the purifier to work efficiently. Let’s dive into the steps for reassembling your air purifier placed in the garage.
Reinstalling The Filter
Start by reinstalling the filter. Make sure it is completely dry. Place the filter back into its slot. Ensure it sits firmly and correctly. A loose filter won’t work properly. Check the manual if you’re unsure about the placement.
Reconnecting Components
Next, reconnect the components. Attach any covers or panels you removed. Secure them tightly. Reconnect any wires or plugs. Ensure all connections are firm. A loose connection might cause malfunction. Double-check each step for accuracy.
Once all parts are reconnected, your air purifier is ready. Place it back in its spot in the garage. Plug it in and turn it on. Enjoy clean, fresh air again.
Testing The Air Purifier
After cleaning your air purifier, it’s essential to test it. Ensuring it works correctly helps maintain a healthy environment in your garage. Testing the air purifier involves checking its functionality and ensuring its cleanliness.
Checking Functionality
First, plug in the air purifier. Turn it on. Listen for unusual sounds.
- The fan should run smoothly.
- No strange noises or vibrations.
Next, check the display panel. Is it showing any error messages? If yes, consult the user manual. Make sure all indicator lights work properly. Test different settings and modes. Ensure each one responds correctly.
Ensuring Cleanliness
Inspect the air purifier’s filters. Are they clean? A dirty filter reduces efficiency. Replace or clean the filter if needed. Wipe the exterior with a damp cloth. Remove dust and debris.
Check the air intake and outlet. Are they clear of obstructions? Blocked vents hinder airflow. Use a brush or vacuum to clean them. Keep the surrounding area clean too. Dust can quickly accumulate in a garage.
| Item | Action |
|---|---|
| Filters | Clean or replace |
| Exterior | Wipe with a damp cloth |
| Air intake/outlet | Brush or vacuum |
Ensuring cleanliness and proper functionality keeps your air purifier working efficiently. Follow these steps regularly. Your garage air will stay fresh and clean.
Credit: community.glowforge.com
Maintenance Tips
Maintaining your air purifier, especially in a garage, ensures it works efficiently. Regular upkeep prevents dust buildup and prolongs filter life. Follow these maintenance tips to keep your air purifier in top shape.
Regular Cleaning Schedule
Set a cleaning schedule for your air purifier. Garages are dusty, so clean the unit weekly. Use a soft, damp cloth to wipe the exterior. Avoid harsh chemicals that can damage the surface.
Check the air intake and outlet vents. These areas accumulate dust quickly. Use a vacuum with a brush attachment to remove dirt. This ensures proper airflow and efficiency.
Prolonging Filter Life
Filters are crucial for your air purifier’s performance. Follow these steps to extend their lifespan:
- Pre-filters: Wash every month. Let them dry completely before re-installing.
- HEPA filters: Vacuum gently every three months. Do not wash.
- Carbon filters: Replace as per the manufacturer’s recommendations. Typically every six months.
Regularly check for filter wear and tear. Replace damaged filters immediately. This prevents contaminants from circulating back into the garage.
Store spare filters in a clean, dry place. This keeps them ready for use when needed.
By following these maintenance tips, your air purifier will function effectively, keeping your garage air clean and fresh.
Credit: www.reddit.com
Frequently Asked Questions
How Often Should I Clean My Air Purifier?
You should clean your air purifier every 2-4 weeks. This ensures optimal performance and air quality. Regular cleaning prevents dust buildup.
What Tools Do I Need To Clean An Air Purifier?
You need a soft cloth, a vacuum with a brush attachment, and mild soap. These tools help in thorough cleaning.
Can I Use Water To Clean The Air Purifier Filter?
Yes, you can use water for washable filters. Rinse gently and let it air dry completely before reinstalling.
Should I Unplug The Air Purifier Before Cleaning?
Yes, always unplug the air purifier before cleaning. This ensures safety and prevents electrical hazards.
Conclusion
Maintaining a clean air purifier in your garage is essential. Regular cleaning ensures optimal performance. Follow the steps outlined above. Unplug the unit first. Remove and wash filters. Use a damp cloth for the exterior. Reassemble the purifier carefully. Place it back in the garage.
Clean it every few months for best results. Breathe fresher, cleaner air. Your garage environment will greatly improve. A well-maintained air purifier lasts longer. Enjoy the benefits of clean air effortlessly.
Rakib Sarwar is a Registered Pharmacist and a reputed health and wellness blogger. He has a great interest in Air purifiers.