Cleaning an air purifier with a carbon pre-filter is simple. You’ll need basic supplies and a few minutes.
Air purifiers keep our indoor air clean, but they need regular maintenance to work well. The carbon pre-filter is essential because it traps large particles and odors. Over time, it gets dirty and less effective. By cleaning it, you ensure your purifier works at its best.
This helps in maintaining healthy air quality in your home. In this guide, we will show you the steps to clean your air purifier’s carbon pre-filter. This process is easy and will extend the life of your air purifier. Let’s get started!

Credit: www.iso-aire.com
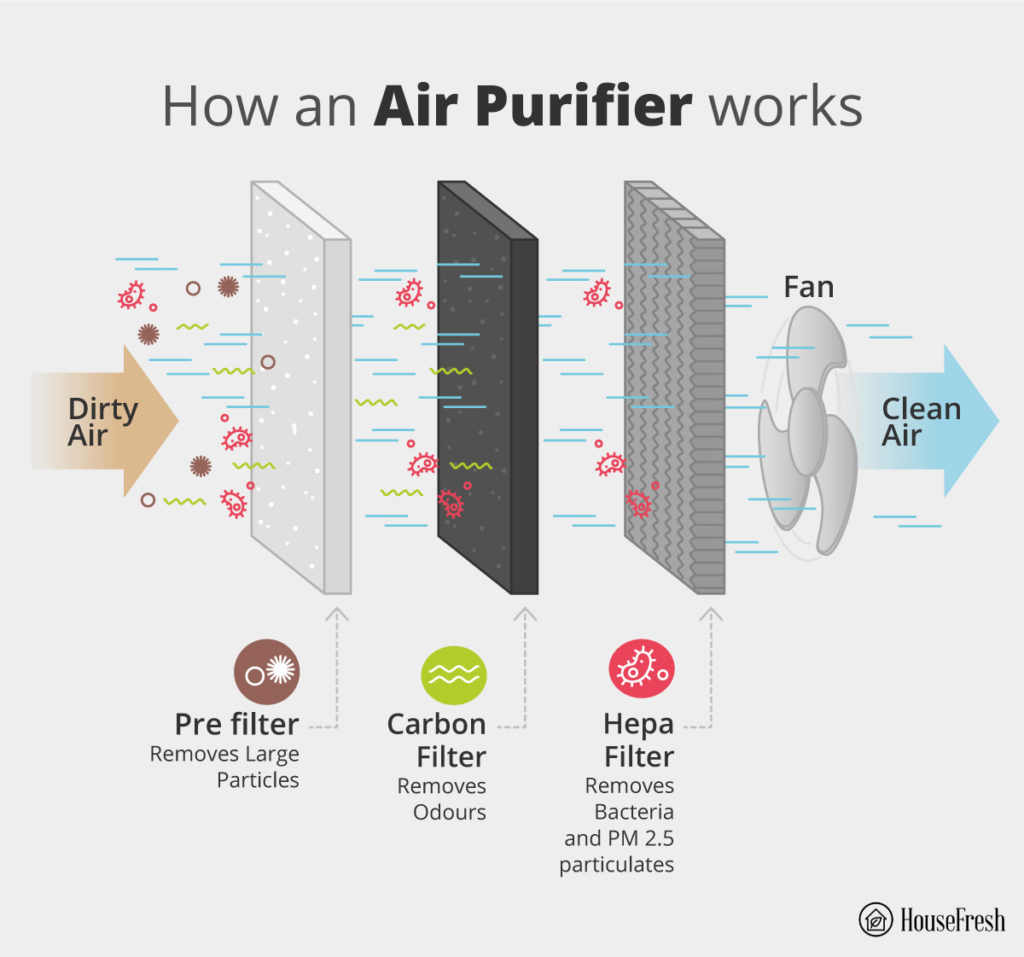
Introduction To Air Purifiers
Air purifiers improve indoor air quality. They remove harmful particles, allergens, and pollutants. This makes them essential for a healthier home environment. Understanding their components and maintenance can help you get the most out of your air purifier.
Importance Of Clean Air
Clean air is vital for good health. Poor indoor air quality can cause allergies, asthma, and other respiratory issues. It can even affect your sleep and overall well-being.
Using an air purifier helps reduce these risks. It filters out dust, pollen, pet dander, smoke, and other pollutants. This creates a cleaner, safer space for you and your family.
Role Of Carbon Pre-filters
Carbon pre-filters are a key part of many air purifiers. They capture large particles before they reach the main filter. This prolongs the life of your air purifier and makes it more effective.
Carbon pre-filters also remove odors from the air. They absorb smells from cooking, pets, and smoke. This makes your home smell fresher and more pleasant.
Regular cleaning of the carbon pre-filter is important. It ensures the air purifier works at its best. Here’s how to clean it effectively:
- Turn off and unplug the air purifier.
- Remove the carbon pre-filter from the unit.
- Gently vacuum the filter to remove dust and debris.
- Rinse the filter with lukewarm water if needed.
- Allow the filter to air dry completely before reinserting.
Regular maintenance keeps your air purifier efficient. It ensures you breathe cleaner air every day.
Gather Necessary Supplies
Cleaning an air purifier with a carbon pre-filter is essential. It ensures the device works efficiently. Before you start, gather all necessary supplies. This will make the process smooth and quick.
Cleaning Tools
First, you need some basic cleaning tools. A soft brush will help remove dust. A vacuum cleaner with a brush attachment is also useful. Use it to clean the outer parts. Microfiber cloths are perfect for wiping surfaces. They attract dust and do not scratch. Have a small bucket of warm, soapy water ready. Mild detergent is best. Avoid harsh chemicals. They can damage the filter.
Replacement Filters
Check if you have replacement filters. Some carbon pre-filters need to be replaced. Look at the user manual. It will tell you if your filter is reusable. If not, buy a new one. Make sure it fits your model. Ordering the right filter is crucial. Having it ready saves time. It ensures your air purifier runs smoothly.
Turn Off And Unplug The Device
Cleaning an air purifier with a carbon pre-filter is essential. Before starting, you must turn off and unplug the device. This step is crucial for your safety and the proper functioning of the purifier.
Safety Precautions
When dealing with electrical devices, safety should always come first. Ensure you follow these simple yet vital precautions:
- Turn off the air purifier using the power button.
- Unplug the device from the electrical outlet to avoid any risk of electric shock.
- Wait a few minutes to ensure all internal components are completely off.
- Keep your hands dry to prevent any electrical hazards.
Preparing The Area
After turning off and unplugging the device, you need to prepare the area for cleaning. A well-prepared area makes the cleaning process smoother and more effective.
- Choose a clean, flat surface to work on.
- Lay down some newspaper or an old cloth to catch any dust or debris.
- Gather all necessary cleaning supplies, such as a soft cloth, mild detergent, and a vacuum cleaner.
- Ensure good lighting to see all parts of the purifier clearly.
By following these steps, you ensure a safe and effective cleaning process. Remember, a clean air purifier works better and lasts longer.

Credit: www.amazon.com
Remove The Pre-filter
Cleaning your air purifier regularly ensures it works efficiently. One key step is removing the pre-filter. The pre-filter captures larger particles, protecting the main filter. To clean it well, follow these steps:
Locating The Pre-filter
First, turn off and unplug the air purifier. Look for the pre-filter inside the unit. Most pre-filters are behind a cover or panel. Check your user manual to find its exact location. The manual usually has diagrams to guide you.
Detaching The Filter
Once you locate the pre-filter, it’s time to remove it. Carefully detach the cover or panel. Some models have clips, while others have screws. Keep these parts safe to reattach later.
Gently pull out the pre-filter. Avoid bending or damaging it. If it’s stuck, check for additional clips or screws. Now, you’re ready to clean the pre-filter and keep your air purifier in top shape.
Clean The Pre-filter
Maintaining your air purifier is essential for its efficiency. One crucial step is cleaning the pre-filter, which catches large particles before they reach the main filter. This process helps prolong the life of your purifier and ensures cleaner air.
Dust Removal
Begin by unplugging your air purifier. Locate the pre-filter; it’s usually the first layer you see. Gently remove the pre-filter from the unit.
Use a vacuum cleaner with a brush attachment. Carefully run the vacuum over the pre-filter to remove dust and debris. This step is crucial for maintaining optimal airflow and efficiency.
Washing Techniques
Some pre-filters are washable. Check your purifier’s manual to confirm. If it’s washable, fill a basin with lukewarm water and a few drops of mild dish soap.
Submerge the pre-filter in the soapy water. Gently swish it around to dislodge any trapped particles. Rinse the pre-filter thoroughly under running water to remove all soap residue.
Allow the pre-filter to air dry completely before reinserting it into the purifier. Ensuring it’s dry prevents mold growth and maintains air quality.
| Step | Action |
|---|---|
| 1 | Unplug the air purifier |
| 2 | Remove the pre-filter |
| 3 | Vacuum the pre-filter |
| 4 | Wash if applicable |
| 5 | Air dry completely |
Regular cleaning of the pre-filter helps maintain your air purifier’s performance. It also extends the life of the main filter, saving you money in the long run.

Credit: www.sanitairecommercial.com
Dry The Pre-filter
After washing your carbon pre-filter, it’s crucial to dry it properly. Drying the pre-filter ensures that it performs efficiently and lasts longer. Here, we discuss the best ways to dry your carbon pre-filter and how to avoid damaging it in the process.
Air Drying Methods
One of the best ways to dry your pre-filter is by air drying. To do this, place the filter on a clean, dry surface. Ensure it is in a well-ventilated area. This helps speed up the drying process. Avoid placing it directly in the sun. Excessive heat can damage the material.
You can also hang the pre-filter using a clothesline. Secure it with clothespins. This allows air to circulate freely around the filter. It dries evenly without bending or warping. Make sure it hangs in a shaded area.
Avoiding Damage
While drying the pre-filter, it is important to handle it carefully. Do not use a hairdryer or any heating device. High temperatures can damage the carbon material. Never wring out the pre-filter. Twisting or squeezing can cause tears or reduce its effectiveness.
Ensure the pre-filter is completely dry before reassembling it into the air purifier. A damp filter can lead to mold growth. This can reduce the air quality and damage the device.
By following these steps, you can effectively dry your carbon pre-filter. This ensures it remains in good condition, providing clean air for your home.
Reassemble The Air Purifier
Reassembling the air purifier is crucial after cleaning the carbon pre-filter. This step ensures your device works optimally. Follow these steps for a seamless reassembly process.
Reattaching The Pre-filter
Start by placing the cleaned carbon pre-filter back into its slot. Ensure it sits snugly within the frame.
- Check the alignment of the pre-filter.
- Make sure it covers the entire surface area.
- Press gently to secure it in place.
Securing The Components
Once the pre-filter is in place, it’s time to secure the other components. Follow these steps:
- Replace the HEPA filter if your air purifier has one.
- Check for proper alignment and fit.
- Reattach the front panel or cover.
Ensure all latches and clips are properly engaged. This prevents any air leaks.
| Component | Action |
|---|---|
| Carbon Pre-Filter | Reattach |
| HEPA Filter | Replace |
| Front Panel | Secure |
After securing all parts, plug the air purifier back in. Turn it on to ensure it runs smoothly. Regular maintenance keeps your air purifier efficient. Clean it every few months.
Regular Maintenance Tips
Maintaining your air purifier ensures it works effectively. Regular maintenance keeps the air in your home clean and healthy. Here are some essential tips for keeping your air purifier in top shape, especially when it has a carbon pre-filter.
Cleaning Schedule
Creating a cleaning schedule is crucial. It helps you remember when to clean your air purifier. Follow these steps for an effective cleaning routine:
- Weekly: Wipe down the exterior with a damp cloth.
- Monthly: Remove and clean the carbon pre-filter.
- Quarterly: Check the condition of the HEPA filter.
A clean air purifier performs better. It also lasts longer.
Signs Of Wear
Recognizing signs of wear helps you maintain your air purifier. Look for these indicators:
- Reduced airflow: The air purifier may struggle to circulate air.
- Unpleasant odors: This suggests the carbon pre-filter needs cleaning.
- Visible dirt: Dust and debris on the filter indicate it’s time for maintenance.
Addressing these signs promptly ensures optimal performance. It also helps maintain clean air in your home.
Frequently Asked Questions
How Often Should I Clean My Air Purifier?
Clean your air purifier every 2-4 weeks. This helps maintain optimal performance and prolongs the filter’s life. Follow the manufacturer’s guidelines.
Can I Wash A Carbon Pre-filter?
No, carbon pre-filters are not washable. Replace them according to the manufacturer’s recommendations, usually every 3-6 months for best results.
What Tools Do I Need To Clean An Air Purifier?
You need a soft cloth, vacuum cleaner with a brush attachment, and sometimes mild soap. Always refer to the user manual.
How Do I Know If My Carbon Pre-filter Needs Replacing?
Check for reduced airflow and increased noise. If you notice persistent odors, it’s time to replace the carbon pre-filter.
Conclusion
Cleaning an air purifier with a carbon pre-filter is simple and essential. Regular maintenance improves air quality and extends the device’s lifespan. Start by unplugging the purifier. Remove and inspect the pre-filter for dust and debris. Rinse it gently with water and let it dry completely.
Reassemble the purifier and enjoy cleaner air. Remember, a clean filter works better, keeping your home fresh and healthy. Follow these steps regularly for optimal performance. Happy breathing!
Rakib Sarwar is a Registered Pharmacist and a reputed health and wellness blogger. He has a great interest in Air purifiers.