Cleaning an air purifier with detachable compartments is simple. First, turn off and unplug the unit.
Then, follow these steps for a thorough clean. Air purifiers help keep our homes free of dust, pollen, and other pollutants. But to work effectively, they need regular cleaning. Detachable compartments make this task easier. They allow you to access and clean each part properly.
In this guide, you will learn how to clean each part of your air purifier. Doing this ensures it works efficiently. Plus, it helps maintain a healthy indoor environment. So, let’s dive into the steps to keep your air purifier in top shape.

Credit: www.amazon.com
Introduction To Air Purifier Maintenance
Maintaining your air purifier is essential for its efficiency and longevity. Proper upkeep ensures that it continues to provide clean air. This guide will teach you how to clean an air purifier with detachable compartments.
Importance Of Regular Cleaning
Regular cleaning of your air purifier is crucial. Dust and dirt can build up and reduce its performance. This can lead to poor air quality in your home. Clean filters and compartments help maintain optimal functioning.
- Improves air quality
- Extends the life of the purifier
- Prevents buildup of allergens and pollutants
Benefits Of Detachable Compartments
Air purifiers with detachable compartments are easier to clean. They allow you to access parts that are usually hard to reach. This makes maintenance less of a hassle.
| Benefit | Description |
|---|---|
| Easy Access | Detachable parts make it simple to reach every section. |
| Thorough Cleaning | You can clean each part more effectively. |
| Time-Saving | Less time is needed for maintenance. |
Here is a step-by-step guide to clean your air purifier:
- Turn off and unplug the air purifier.
- Remove the detachable compartments.
- Wash the filters with water or a mild detergent.
- Dry the filters completely before reinserting.
- Wipe down the inside and outside of the purifier.
- Reassemble the parts and plug it back in.
Regular maintenance keeps your air purifier in top shape. It ensures you breathe clean, fresh air every day.
Tools And Supplies Needed
Cleaning an air purifier with detachable compartments may seem daunting at first. But with the right tools and supplies, the process becomes straightforward. This guide will walk you through the essential cleaning tools and recommended cleaning agents needed for the job.
Essential Cleaning Tools
To start, gather these essential tools. A soft brush will help remove dust and debris from filters. A vacuum cleaner with a brush attachment can be useful for this task too. Soft microfiber cloths are great for wiping down surfaces without scratching them. Finally, a screwdriver may be necessary to detach compartments.
Recommended Cleaning Agents
Choose cleaning agents that are safe for your air purifier. Mild dish soap mixed with warm water is often effective. Avoid harsh chemicals that can damage your device. White vinegar is a good alternative for a natural cleaning solution. It helps to disinfect and remove any lingering odors.
Pre-cleaning Preparations
Cleaning an air purifier with detachable compartments can be straightforward. But, before you start, it’s important to prepare. This ensures that the cleaning process is safe and effective. Proper preparation also helps to avoid any damage to the purifier.
Safety Precautions
Before cleaning, always turn off the air purifier. Unplug it from the power source to ensure safety. This prevents any risk of electrical shock. Read the user manual for specific cleaning instructions.
Wear gloves to protect your hands from dust and debris. Use a mask if you have allergies. This will help you avoid inhaling any dust particles.
Disassembling The Air Purifier
Carefully remove the detachable compartments. Start with the outer cover. Follow the instructions in the user manual. Take note of how each part fits together. This will make reassembly easier.
Place the parts on a clean surface. Use a soft cloth to prevent scratches. Keep all screws and small parts in a safe place. This ensures you won’t lose any crucial pieces.
Credit: www.ebay.com
Cleaning The Exterior
Keeping the exterior of your air purifier clean is essential. It ensures the device looks good and performs well. Dust and dirt can accumulate on the surface and the control panel. Regular cleaning helps extend the life of your air purifier.
Wiping Down The Surface
Start by unplugging the air purifier. Use a soft, damp cloth to wipe down the exterior. Avoid using harsh chemicals as they can damage the surface. Focus on areas where dust is most visible. Pay attention to the air vents. Dust buildup can block airflow.
For stubborn spots, use a mild soap solution. Dampen the cloth with the solution and gently wipe the affected area. Make sure to dry the surface with a clean, dry cloth. This prevents any moisture from seeping into the device.
Cleaning The Control Panel
The control panel is a sensitive part of the air purifier. Use a soft, dry cloth to clean it. Avoid using wet cloths or cleaning sprays directly on the panel. These can damage the electronic components.
If there are fingerprints or smudges, use a slightly damp cloth. Gently wipe the control panel without applying too much pressure. Dry it immediately with a clean, dry cloth. This ensures the control panel stays in good condition.
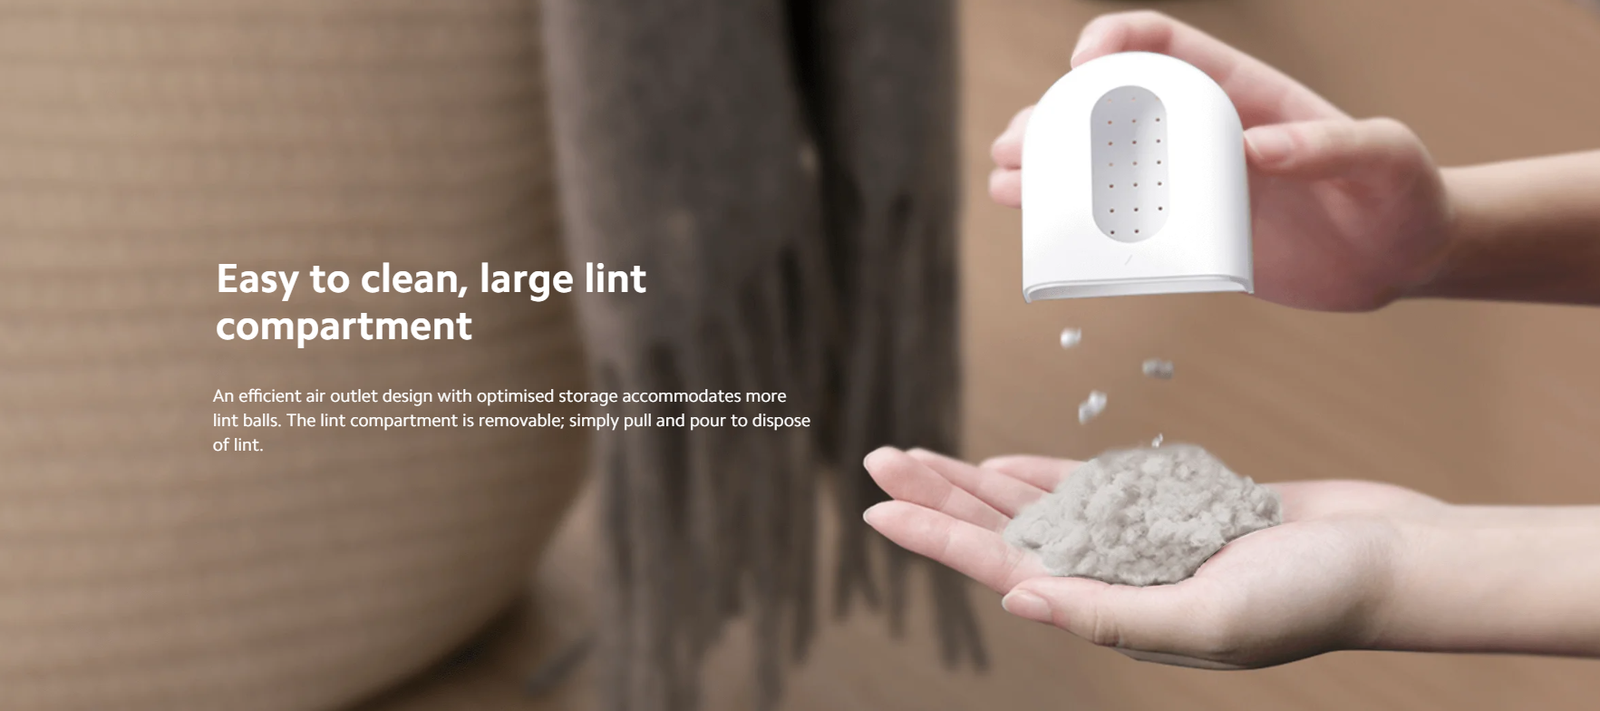
Cleaning The Filters
Keeping your air purifier in top shape involves regular cleaning. Filters are the most critical part. They trap dust, allergens, and other particles. Cleaning them ensures your air purifier works efficiently. Let’s dive into how to clean the filters properly.
Removing The Filters
First, unplug the air purifier. Safety first. Then, locate the filter compartment. Most air purifiers have a latch or button. Open it gently. Carefully remove the filters. Note their position. This will help you reassemble them later.
Washing And Drying The Filters
Next, take the filters to your sink. Use lukewarm water. Rinse the filters thoroughly. Avoid using soap. It can damage the filter material. For stubborn dirt, use a soft brush. Gently scrub the filters.
After washing, shake off excess water. Place the filters in a dry area. Let them air dry completely. This might take a few hours. Ensure they are fully dry before reassembling. Moisture can harm your air purifier.
Cleaning The Internal Components
Air purifiers with detachable compartments need regular cleaning. This ensures optimal performance. Cleaning the internal parts might seem daunting. But with the right steps, it becomes easy. Let’s break down the process into simple steps.
Accessing Internal Parts
Start by unplugging the air purifier. Safety first! Next, remove the outer cover. Most models have screws or clips. Use a screwdriver or your hands. Now, you can see the internal parts. Locate the fan and other compartments. These need thorough cleaning.
Cleaning Fan Blades And Compartments
The fan blades gather dust over time. Use a soft brush to clean them. A vacuum with a brush attachment works too. Be gentle to avoid damage. For the compartments, use a damp cloth. Wipe them down to remove dust and grime. Ensure all parts are dry before reassembling.
Here is a handy table for quick reference:
| Step | Action |
|---|---|
| 1 | Unplug the purifier |
| 2 | Remove the outer cover |
| 3 | Access internal parts |
| 4 | Clean fan blades |
| 5 | Wipe compartments |
| 6 | Ensure parts are dry |
| 7 | Reassemble and plug in |
Following these steps ensures your air purifier works effectively. Clean internal components regularly. It keeps the air fresh and the machine running smoothly.
Reassembling The Air Purifier
Reassemble the air purifier by aligning the compartments properly. Ensure each part clicks into place securely. This step is crucial for the device to function well after cleaning.
Once you have cleaned all parts of your air purifier, it’s time to reassemble it. This step is crucial to ensure your air purifier works efficiently. Follow these steps to put everything back together properly.Ensuring All Parts Are Dry
Before reassembling, check that all parts are completely dry. Moisture can damage the air purifier’s components. Use a dry cloth or leave them out to air dry. Patience is key here. Make sure there are no wet spots.Reattaching The Filters And Compartments
Start by placing the filters back into their respective slots. Ensure they fit snugly. Align the compartments and snap them back into place. Double-check each connection. The compartments should click securely. If they don’t, try adjusting the alignment. Following these steps ensures your air purifier runs smoothly. Proper reassembly is essential for maintaining clean air. “`Post-cleaning Maintenance Tips
Keeping your air purifier in top condition requires regular maintenance. After cleaning, follow these tips to ensure it runs smoothly. Proper care extends the life of your device. It also ensures your air stays clean.
Regular Cleaning Schedule
Establish a regular cleaning routine. Clean the detachable compartments every two weeks. This prevents dust and debris build-up. Check and clean the filters monthly. Replace them if needed.
A clean purifier works more efficiently. It also improves air quality in your home. Set reminders to help you stay on track.
Monitoring Air Purifier Performance
Keep an eye on your purifier’s performance. Notice any changes in noise levels or airflow? These can signal that the device needs attention. A drop in performance might mean it’s time for a deeper clean.
Check the indicator lights. They can alert you to needed maintenance. Regular monitoring keeps your purifier working at its best.
Troubleshooting Common Issues
Cleaning an air purifier with detachable compartments involves removing and washing each part. Ensure all components are dry before reassembling. Regular maintenance keeps your air purifier functioning efficiently.
When cleaning an air purifier with detachable compartments, you might face some issues. Knowing how to troubleshoot these problems can save you time and effort. Let’s explore some common issues and how to fix them.Unusual Noises
Unusual noises can disrupt the peace in your home. Check if any parts are loose. Tighten screws and secure all compartments. Sometimes, debris can get stuck inside. Clean the fan and filters to remove any debris. If the noise persists, consider replacing the filters.Reduced Airflow
Reduced airflow affects the air purifier’s performance. Start by checking the filters. Dirty filters can block airflow. Clean or replace them if needed. Also, inspect the air intake and outlet. Dust and debris can accumulate there. Use a vacuum or a soft brush to clean these areas. Ensure all compartments are properly aligned and secured. “`
Credit: www.bestbuy.com
Frequently Asked Questions
How Do I Start Cleaning An Air Purifier?
To start cleaning, turn off and unplug the air purifier. Carefully detach all removable compartments. Follow the manufacturer’s instructions for proper disassembly.
Can I Wash The Air Purifier Filters?
Check the user manual for filter care instructions. Some filters are washable, while others need replacement. Follow the recommended method for your specific model.
How Often Should I Clean My Air Purifier?
Clean your air purifier every month or as needed. Frequency depends on usage and air quality. Regular cleaning ensures optimal performance and longevity.
What Tools Do I Need For Cleaning?
You will need a soft cloth, mild detergent, and a vacuum cleaner. These tools help in thorough cleaning without damaging the components.
Conclusion
Cleaning an air purifier with detachable compartments is simple and essential. Regular maintenance keeps it working efficiently. Remove and wash the filters. Wipe down the compartments with a damp cloth. Dry everything thoroughly before reassembling. This prevents mold and bacteria buildup.
A clean air purifier ensures healthier air at home. Follow these steps regularly for the best results. Your air purifier will last longer and work better. Enjoy fresh, clean air every day. Happy cleaning!
Rakib Sarwar is a Registered Pharmacist and a reputed health and wellness blogger. He has a great interest in Air purifiers.