Cleaning pre-filters in air purifiers is essential for optimal performance. It ensures clean air and extends the lifespan of the device.
Air purifiers work hard to keep the air in your home clean and fresh. Over time, dust, pet hair, and other particles build up on the pre-filters. This can reduce the efficiency of the purifier. Regular cleaning of these filters can help maintain air quality and keep the device running smoothly.
In this guide, we will walk you through the simple steps to clean pre-filters in air purifiers. By following these steps, you can ensure that your air purifier works effectively and lasts longer. Let’s dive in and learn how to keep your air purifier in top shape!

Credit: www.breathenaturally.com
Importance Of Clean Pre-filters
The importance of clean pre-filters in air purifiers cannot be overstated. Pre-filters trap large particles like dust, hair, and pet dander. This keeps the main filter working efficiently. Regular cleaning of pre-filters ensures optimal performance. Neglecting this can lead to a decrease in air quality. It can also cause health issues for you and your family.
Health Benefits
Clean pre-filters mean fewer allergens in your home. This can help reduce allergy symptoms. Clean air is especially important for those with asthma. It can lead to fewer asthma attacks. Your family will breathe easier and feel better.
Improved Air Quality
Clean pre-filters help maintain high air quality. They remove large particles from the air. This keeps your home environment fresh and clean. A clean pre-filter ensures that the main filter works effectively. This leads to cleaner air throughout your home. Better air quality means a healthier living space.

Credit: www.youtube.com
Identifying When To Clean
Keeping your air purifier’s pre-filters clean is essential for maintaining indoor air quality. Identifying the right time to clean them ensures your device works efficiently. Let’s dive into the key indicators and cleaning schedule for your pre-filters.
Signs Of Dirty Filters
- Reduced Airflow: Noticeable decrease in the air coming from the purifier.
- Increased Noise: The purifier sounds louder than usual.
- Visible Dirt: Dust or debris visible on the filter surface.
- Odor: Unpleasant smell from the purifier.
Recommended Cleaning Frequency
Regular cleaning of pre-filters ensures optimal performance. Follow these general guidelines:
| Environment | Cleaning Frequency |
|---|---|
| High Pollution | Every 2 weeks |
| Moderate Pollution | Once a month |
| Low Pollution | Every 2-3 months |
By following these steps, you can keep your air purifier running smoothly. Regular checks and cleanings will ensure cleaner air in your home.
Gathering Necessary Supplies
Before you start cleaning the pre-filters in your air purifier, you need to gather all the necessary supplies. Being prepared will make the cleaning process smooth and efficient. In this section, we will break down the essential tools and safety measures you need to follow.
Cleaning Tools
To clean the pre-filters effectively, you will need the following tools:
- Vacuum Cleaner: Use a vacuum with a soft brush attachment.
- Soft Cloth: A microfiber cloth works best for wiping down surfaces.
- Warm Water: Use warm water to rinse the pre-filters.
- Dish Soap: Mild dish soap can help remove stubborn dirt.
- Drying Rack: Use this to air-dry the filters after washing.
Safety Precautions
While cleaning the pre-filters, it’s important to follow these safety precautions:
- Unplug the Air Purifier: Always unplug the device before starting any cleaning.
- Wear Gloves: Protect your hands from dust and cleaning agents.
- Read the Manual: Check the manufacturer’s instructions for specific cleaning advice.
- Work in a Ventilated Area: Ensure you are in a well-ventilated space to avoid inhaling dust.
By gathering these supplies and following these safety precautions, you can ensure a thorough and safe cleaning process for your air purifier’s pre-filters.
Step-by-step Cleaning Guide
Keeping your air purifier in top shape means cleaning the pre-filters regularly. It’s a simple task that ensures your air purifier works efficiently. Follow this step-by-step guide to clean your pre-filters easily.
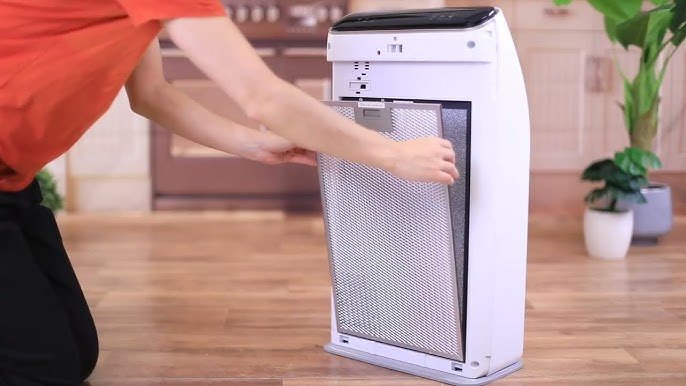
Removing The Pre-filter
Start by turning off your air purifier and unplugging it. Safety first! Now, locate the pre-filter. This is usually found at the back or side of the unit. Consult your user manual if you’re unsure.
Carefully remove the cover. You might need to press a button or slide a latch. Once open, gently take out the pre-filter. It may be dusty, so handle it with care to avoid scattering dust everywhere.
Washing And Drying
Take the pre-filter to a sink. Rinse it under cold water to remove loose dust and debris. For a deeper clean, fill a basin with warm water and a small amount of mild soap.
Soak the pre-filter in the soapy water for 10-15 minutes. Use a soft brush to scrub away any stubborn dirt. Rinse thoroughly to remove all soap.
Shake off excess water and let the pre-filter air dry completely. Do not use a hair dryer or place it in direct sunlight. It must be fully dry before reinstalling to prevent mold growth.
Once dry, reassemble your air purifier. Replace the pre-filter and secure the cover. Plug in the purifier and turn it on. Enjoy fresh, clean air!
Reinstalling The Pre-filter
Cleaning the pre-filter in your air purifier is a crucial task. But, reinstalling it properly is just as important to ensure optimal performance. Here, we will discuss how to reinstall the pre-filter correctly, focusing on proper placement and ensuring a tight seal.
Proper Placement
After cleaning, make sure the pre-filter is completely dry. A wet filter can cause mold growth. Once dry, identify the correct position for the pre-filter. This usually matches the outline or slots in the air purifier.
Align the pre-filter with these guides. Some air purifiers have clips or tabs to hold the filter in place. Ensure these are properly engaged. Misalignment can reduce the purifier’s effectiveness.
If the pre-filter has a specific front or back side, follow the manufacturer’s instructions. Incorrect placement can block airflow or reduce the filter’s efficiency.
Ensuring A Tight Seal
A tight seal is crucial for the air purifier to function properly. Check the edges of the pre-filter to ensure it fits snugly. Gaps can allow unfiltered air to bypass the filter.
Press down on the pre-filter to secure it in place. If your purifier has a locking mechanism, engage it fully. This prevents the filter from shifting during operation.
Test the seal by running the purifier for a few minutes. Listen for unusual noises that might indicate a loose filter. If you hear any, turn off the purifier and recheck the installation.
| Step | Action |
|---|---|
| 1 | Ensure the pre-filter is dry |
| 2 | Align with guides or slots |
| 3 | Secure clips or tabs |
| 4 | Check for proper alignment |
| 5 | Press down to ensure a tight seal |
| 6 | Test the seal by running the purifier |
Following these steps ensures your air purifier works efficiently. Proper placement and a tight seal prevent unfiltered air from circulating. Regular maintenance keeps your indoor air clean and healthy.

Credit: www.philips.com.lb
Maintenance Tips
Maintaining your air purifier’s pre-filter is crucial for its efficiency. Regular maintenance ensures cleaner air and a longer-lasting device. Follow these tips to keep your air purifier running smoothly.
Regular Inspection
Inspect the pre-filter at least once a month. Dust and debris can accumulate quickly. Visual checks help identify any buildup. Clean the filter if it looks dirty.
Use a flashlight to see small particles. A clean pre-filter improves air quality. Make this inspection a routine task.
Replacement Guidelines
Replace the pre-filter every three to six months. Follow the manufacturer’s instructions. Some filters may last longer.
Mark your calendar for replacement dates. A new filter ensures optimal performance. Don’t wait until the filter is visibly dirty.
Always have spare filters on hand. This way, you’re never caught unprepared. Clean air is essential for health.
Common Mistakes To Avoid
Cleaning pre-filters in air purifiers is essential for maintaining air quality. Mistakes during cleaning can reduce efficiency and damage the device. Here are some common mistakes to avoid while cleaning pre-filters.
Using Harsh Chemicals
Many think harsh chemicals clean better, but they can harm pre-filters. Chemicals can degrade filter material and reduce lifespan. Instead, use mild soap and water for cleaning.
Follow these steps for safe cleaning:
- Remove the pre-filter from the air purifier.
- Rinse the filter with lukewarm water.
- Use a soft brush to scrub gently.
- Mix mild soap with water for stubborn dirt.
- Rinse thoroughly and let it air dry completely.
Improper Handling
Improper handling can damage the pre-filter and affect performance. Always handle filters with care to avoid tearing or bending.
Here are some tips to avoid mishandling:
- Turn off the air purifier before removing the filter.
- Hold the filter by the frame, not the mesh.
- Avoid using excessive force when removing or inserting the filter.
- Store the filter in a clean, dry place if not in use.
Proper handling ensures the filter stays in good condition and works efficiently.
Expert Advice
Clean pre-filters in air purifiers regularly to maintain efficiency. Remove the filter, rinse with water, and let it dry completely before reinstalling.
Cleaning pre-filters in air purifiers is vital for maintaining air quality. Experts provide valuable insights to ensure your air purifier works efficiently. Let’s explore professional cleaning services and manufacturer recommendations for cleaning pre-filters.Professional Cleaning Services
Professional cleaning services can take the hassle out of maintenance. Experts use specialized tools and techniques to clean pre-filters. This ensures thorough removal of dust and debris. They can also inspect the filter for damage. Regular professional cleaning extends the life of your air purifier. It also ensures optimal performance.Manufacturer Recommendations
Always follow the manufacturer’s recommendations. They provide specific instructions for cleaning pre-filters. This information is usually found in the user manual. Manufacturers often suggest using mild soap and water. They may also recommend vacuuming the pre-filter. Avoid using harsh chemicals that can damage the filter. Regularly check for updates on the manufacturer’s website. This ensures you use the latest cleaning techniques. “`Frequently Asked Questions
How Often Should I Clean Pre-filters In Air Purifiers?
Pre-filters should be cleaned every 2-4 weeks. This ensures optimal performance and extends the life of your air purifier.
What Tools Do I Need To Clean Pre-filters?
You typically need a vacuum cleaner, soft brush, and water. These tools help remove dust and debris effectively.
Can I Wash Pre-filters With Water?
Yes, you can wash pre-filters with water. Make sure to dry them completely before reinstalling to prevent mold growth.
Why Is It Important To Clean Pre-filters?
Cleaning pre-filters improves air purifier efficiency. It also ensures better air quality and prolongs the filter’s lifespan.
Conclusion
Cleaning pre-filters in air purifiers is essential for optimal performance. Regular maintenance ensures cleaner air and extends the purifier’s life. Always check the manufacturer’s guidelines before cleaning. Simple steps like vacuuming or rinsing with water can be effective. Dry the filters completely before reattaching them.
Consistent care keeps your air purifier working efficiently. Cleaner air leads to a healthier home environment. So, follow these easy steps and enjoy fresh air daily.
Rakib Sarwar is a Registered Pharmacist and a reputed health and wellness blogger. He has a great interest in Air purifiers.