Cleaning an air purifier placed near a window is easy. Follow these steps for best results.
Air purifiers help keep our indoor air clean. Over time, dust and dirt can build up, especially when placed near a window. This can reduce the purifier’s efficiency. Regular cleaning ensures it works well and lasts longer. In this guide, we’ll explain how to clean your air purifier in simple steps.
You’ll learn the tools needed and the best techniques. Ready to breathe cleaner air? Let’s get started!
Credit: centerforhealthsecurity.org
Benefits Of Clean Air Purifiers
A clean air purifier ensures that the air around you remains fresh and healthy. Regular maintenance of your air purifier, especially if placed near a window, brings many benefits. This section will highlight the major advantages of keeping your air purifier clean.
Improved Air Quality
One significant benefit of a clean air purifier is the improved air quality. When the filters are free from dust and debris, the purifier can effectively remove pollutants. This means fewer allergens, dust particles, and harmful substances in the air.
Cleaner air reduces the risk of respiratory issues and allergies. Families with children, elderly members, or pets can experience better health.
In urban areas with high pollution levels, clean air purifiers make a noticeable difference. They can help in minimizing the effects of smog and other pollutants.
Enhanced Efficiency
Another advantage is the enhanced efficiency of the air purifier. When filters and components are clean, the device works more efficiently. This ensures it can purify the air quickly and effectively.
A clean air purifier uses less energy, saving on electricity bills. This is especially beneficial for those who use the purifier for extended periods.
Regular maintenance also extends the lifespan of the purifier. This reduces the need for frequent replacements and ensures consistent performance over time.
| Benefit | Description |
|---|---|
| Improved Air Quality | Removes more pollutants and allergens. |
| Enhanced Efficiency | Operates more effectively and uses less energy. |
| Extended Lifespan | Reduces wear and tear on the device. |
| Healthier Environment | Promotes better health for all household members. |
Keeping your air purifier clean offers many benefits. It ensures better air quality, higher efficiency, and a healthier living environment.
Tools And Materials Needed
To clean an air purifier placed near a window, gathering the right tools and materials is essential. This ensures the process is smooth and effective. Below, find the necessary cleaning supplies and protective gear.
Cleaning Supplies
- Soft Cloths: For wiping down the exterior and interior parts.
- Vacuum Cleaner with Brush Attachment: To remove dust and debris.
- Water: For rinsing washable filters.
- Dish Soap: A mild soap to clean washable parts.
- Soft Brush: To scrub hard-to-reach areas.
- Compressed Air: For blowing out dust from the internal components.
Protective Gear
- Gloves: Protect your hands from dirt and cleaning chemicals.
- Face Mask: Prevents inhalation of dust and debris.
- Goggles: Shields your eyes from dust particles.
Having these tools and materials will make cleaning your air purifier straightforward and effective. Ensure you gather everything before starting to save time and effort.
Safety Precautions
Cleaning your air purifier is essential for its efficiency. Safety comes first. Follow these safety steps to protect yourself and your device.
Unplugging The Unit
Always unplug the air purifier before cleaning. This step prevents electric shocks. Avoid touching the device with wet hands.
Ensure the plug is dry. A dry plug reduces the risk of electrical hazards.
Wearing Gloves And Mask
Wear gloves and a mask while cleaning. This protects you from dust and allergens.
Disposable gloves are best. They keep your hands clean. A mask filters out airborne particles. It ensures you do not inhale dust.
| Safety Gear | Purpose |
|---|---|
| Gloves | Protects hands from dirt |
| Mask | Prevents inhalation of dust |
Following these steps ensures your safety. It also keeps your air purifier in good condition.
Disassembling The Air Purifier
Cleaning your air purifier is essential for its efficiency. Placing it near a window means it gathers more dust and pollen. Disassembling it correctly is the first step. This process might seem tricky, but it’s simple with a bit of guidance. Let’s break it down.
Removing Filters
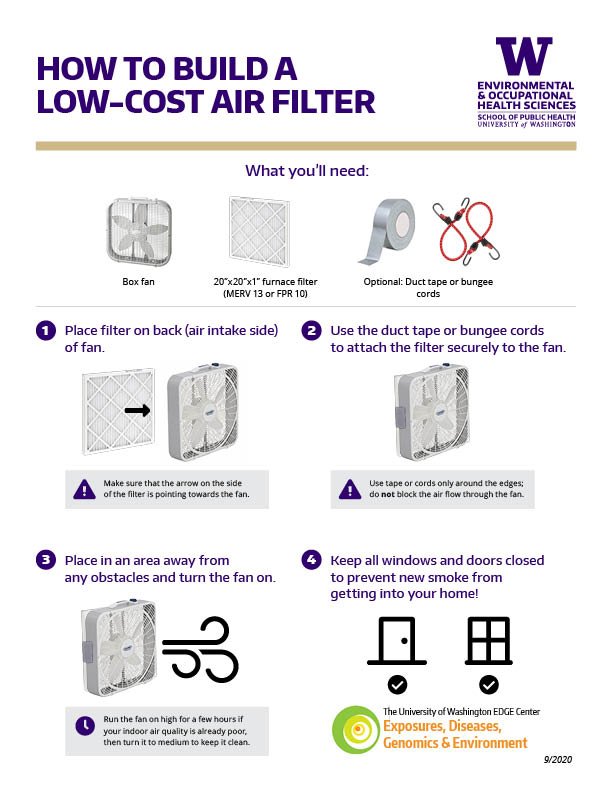
Filters are the most critical part of your air purifier. They trap dust, pollen, and other particles. To remove them:
- Turn off and unplug the air purifier.
- Locate the filter compartment. This is usually at the back or bottom.
- Open the compartment using the release latch or screws.
- Carefully pull out the filters. Note their order and orientation.
It’s crucial to handle filters gently. They can be fragile and expensive to replace.
Detaching Other Components
Besides the filters, other parts need cleaning. These include the pre-filter, air intake grill, and fan blades. Here’s how you can detach them:
- Remove the pre-filter, usually attached to the main filter.
- Unscrew or unlatch the air intake grill.
- Access the fan blades by removing the casing. Be careful not to damage any wires.
Each component plays a role in your purifier’s performance. Clean them thoroughly to maintain efficiency.
Remember, keeping your air purifier clean ensures it works well. Regular maintenance extends its life and keeps your air fresh.
Cleaning The Exterior
Dust and grime can collect on air purifiers placed near windows. Wipe the exterior regularly with a damp cloth. Use mild soap if needed.
Cleaning the exterior of an air purifier placed near a window is essential. Dust and dirt accumulate on the outside surfaces. Regular cleaning ensures the purifier works efficiently. Let’s explore how to clean the exterior thoroughly.Wiping Down Surfaces
Begin by unplugging the air purifier. Use a damp cloth to wipe down the surfaces. Focus on removing dust and smudges. Avoid using harsh chemicals. They can damage the exterior. Instead, opt for mild soapy water. Gently scrub the surfaces. Dry them with a clean towel. Make sure no moisture remains.Cleaning Vents
Vents can get clogged with dust. This reduces the purifier’s efficiency. Use a soft brush or a vacuum cleaner. Carefully remove dust from the vents. Pay attention to every crevice. A can of compressed air helps too. Spray it gently to dislodge any trapped particles. Clean vents ensure better air flow and purification. “`
Credit: housefresh.com
Cleaning The Filters
Cleaning the filters of your air purifier is essential. It ensures optimal performance and air quality. An air purifier placed near a window can accumulate more dust and pollutants. This makes filter cleaning even more important. Below, we will discuss the steps to clean reusable and replace disposable filters.
Washing Reusable Filters
Reusable filters require regular cleaning. Follow these steps for best results:
- Turn off and unplug the air purifier.
- Remove the filter from the unit.
- Check the manufacturer’s instructions for washing guidelines.
- Rinse the filter under lukewarm water. Avoid using soap.
- Gently shake off excess water.
- Allow the filter to air dry completely before reinstalling.
Important: Never use a wet filter in the air purifier.
Replacing Disposable Filters
Disposable filters need regular replacement. Follow these steps:
- Turn off and unplug the air purifier.
- Open the unit and remove the old filter.
- Dispose of the old filter properly.
- Insert the new filter into the unit.
- Close the unit and plug it back in.
Tip: Check the manufacturer’s guidelines for replacement frequency. Most disposable filters need replacing every 3-6 months.
| Filter Type | Cleaning Method | Frequency |
|---|---|---|
| Reusable | Wash with water | Monthly |
| Disposable | Replace with new | Every 3-6 months |
Reassembling The Air Purifier
Reassembling your air purifier is essential after thorough cleaning. Ensuring all parts are correctly placed guarantees its efficiency. Follow these steps to reattach filters and secure other parts.
Reattaching Filters
Properly reattaching filters is crucial. Begin by identifying the correct placement for each filter. Consult the user manual if unsure.
- HEPA Filter: Slide the HEPA filter back into its slot.
- Carbon Filter: Place the carbon filter behind the HEPA filter.
- Pre-Filter: Attach the pre-filter to the front.
Ensure each filter clicks into place. If it feels loose, check the alignment. A secure fit ensures optimal performance.
Securing Other Parts
After filters are in place, focus on securing other parts. Ensure the air purifier’s casing is clean and dry. Align the casing with the base.
- Attach the front panel first.
- Secure any screws or clips.
- Ensure the power cord is properly connected.
Double-check all connections. A well-secured air purifier prevents air leaks. This maintains the efficiency of your device.
After reassembling, plug in the air purifier. Turn it on to test. A correctly assembled purifier will run smoothly.
Maintenance Tips
Maintaining an air purifier placed near a window is essential. It ensures the device works efficiently. Dust and pollutants from outside can clog the filters. Regular maintenance can prevent this. Here are some essential tips to keep your air purifier in top shape.
Regular Cleaning Schedule
Establish a cleaning schedule. Clean the air purifier every two weeks. Use a soft cloth to wipe down the exterior. For the filters, follow the manufacturer’s instructions. Some filters are washable. Others need to be replaced. Regular cleaning prevents dust buildup. It keeps the air purifier running smoothly.
Monitoring Air Quality
Keep an eye on the air quality. Many air purifiers have indicators. These show the air quality levels. If the air quality drops, check the filters. They might need cleaning or replacement. Monitoring air quality helps you respond quickly. It ensures your air purifier is always effective.
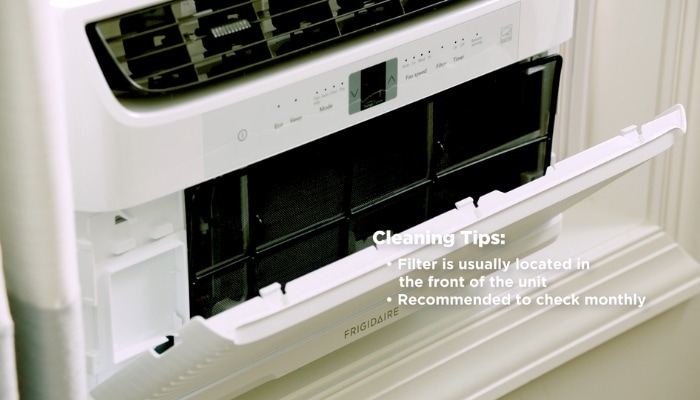
Credit: support.frigidaire.com
Frequently Asked Questions
How Often Should I Clean My Air Purifier?
Clean your air purifier every two weeks for optimal performance. Follow the manufacturer’s instructions for specific cleaning recommendations. Regular maintenance ensures efficient operation.
Can I Use Water To Clean My Air Purifier?
Use a damp cloth for external surfaces. Avoid water on electrical components. Clean filters according to the manufacturer’s guidelines, often involving vacuuming or rinsing.
What Tools Do I Need To Clean An Air Purifier?
You need a vacuum cleaner, a damp cloth, and sometimes mild soap. Always refer to your purifier’s manual for specific cleaning tools and instructions.
Is It Safe To Place An Air Purifier Near A Window?
Yes, it’s safe but ensure the purifier is not exposed to direct sunlight or rain. Proper placement improves air circulation and purifier efficiency.
Conclusion
Cleaning an air purifier near a window is straightforward. Regular maintenance ensures peak performance. First, unplug the device. Then, remove and wash filters. Wipe down the exterior. Make sure to dry filters completely before reassembling. Regular cleaning helps improve air quality.
Clean monthly for best results. Keep your home fresh and healthy with these simple steps. Happy breathing!
Rakib Sarwar is a Registered Pharmacist and a reputed health and wellness blogger. He has a great interest in Air purifiers.